The other white meat
June 26, 2008

The National Pork Board may promote its product as “the other white meat,” but in our household, we’d choose pork over chicken any day.
That’s why one of our favorite shopping bargains is pork loin. When one of the local grocery stores sells a full-sized loin for under $2 a pound, well, we’re in hog heaven. We butcher ours ourselves (although most grocery stores are happy to cut it for you), typically into a roast and pork chops of varying thicknesses, pick out what we’ll need for two or three meals, and then pop the rest in the freezer.
With thicker-cut pork chops, around 1 ½ to 2 inches, we usually fire up the grill and keep it simple. Coat the pork chops with Creole seasoning and maybe a few brushes of Italian dressing, then cook over low heat for approximately 20 to 25 minutes or until nicely caramelized.
Two of our favorite dishes to make from a pork loin are fried pork chops and herbed pork roast – recipes that taste very different from one another but which are equally delicious.
This is a dish for those who aren’t afraid to throw calorie-consciousness to the wind. We usually serve these golden brown, crispy pork chops with baked macaroni and cheese and green beans that have been slow cooked with ham hocks – making this meal the ultimate in comfort food.
Fried pork chops
4 ¾-inch thick pork chops
2 cups buttermilk
1 tablespoon Creole seasoning blend
½ cup flour
½ cup bread crumbs
Vegetable oil
Use a fork to poke shallow holes in the pork chops, and then place the pork chops in a 1-gallon zip-top bag. Pour buttermilk into the bag to cover the pork chops, and soak for at least 2 hours in the refrigerator.
Heat ½ inch vegetable oil in a cast-iron skillet, just slightly over medium heat.
Combine the flour and bread crumbs in a shallow bowl.
Remove the pork chops from the bag and shake off excess buttermilk. Coat both sides of the pork chops with Creole seasoning, then dip into the flour/bread crumb mixture. Thoroughly shake off excess bread crumbs, and carefully place the pork chops into the skillet.
Cook until golden brown, approximately 5 minutes per side. Remove from skillet and drain on paper towels.
—
In the summertime, we take full advantage of our herb garden when making this roasted pork dish, but Jerry also has adapted it for the colder months using dried herbs.
Herbed pork roast with garlic mashed potatoes
1 ½ tablespoons Italian seasoning, or ½ tablespoon each dried basil, oregano and thyme
1 teaspoon sage
½ tablespoon salt
1 tablespoon pepper
½ cup flour
1 whole head of garlic, peeled and top cut off
¼ cup olive oil
3- to 4-pound pork loin roast
4 cups water
4 teaspoons chicken bouillon
Heat olive oil in a crock pot over high heat.
In a large bowl, combine herbs, salt, pepper and flour. Pat the roast dry and coat it in the flour mixture (do not discard flour mixture).
Brown the roast in the crock pot for approximately 1 minute per side.
Add remaining flour mixture and the garlic to the crock pot and stir approximately 1 minute to make a roux.
Add the water (it should not completely cover the roast) and chicken bouillon. Bring to a boil, then reduce heat to approximately 215 degrees and simmer for 2 ½ to 3 hours.
Serve with garlic mashed potatoes.
—
Garlic mashed potatoes
2 to 3 heads garlic (depending on size)
Olive oil
3 or 4 baking potatoes (again, depending on size), washed, with skins on for added texture
½ cup sour cream
¼ cup milk
Preheat oven to 400 degrees.
Cut off the top ¼ of each head of garlic, making sure each individual clove is exposed. Place the heads of garlic in the center of a 1-square-foot sheet of aluminum foil, and cover the tops liberally with olive oil and cracked black pepper. Wrap the foil around the heads of garlic and bake for one hour. Allow garlic to cool, then squeeze out individual cloves.
Cook potatoes in boiling water until fork tender. Drain potatoes and return them to the stove over low heat to remove any excess moisture. Meanwhile, add the roasted garlic, sour cream and milk. Use a hand masher or mixer to reach desired consistency.
Spaghetti sauce with meatballs
June 24, 2008

Homemade spaghetti sauce with meatballs is definitely a weekend dish at our house because, although the sauce can be ready in a little over an hour, the longer it simmers, the thicker and more flavorful it becomes. And, with its combination of garlic, basil, oregano and thyme, it makes the house smell heavenly, so why not leave it on the stove all afternoon?
While this meal reheats well as a whole, oftentimes we’ll make meatball subs as a second-day dish. Prepared on fresh sub rolls and then heated in the oven with a few slices of mozzarella cheese on top, these hot sandwiches makes a fantastic – and quite fulfilling – lunch.
Spaghetti sauce with meatballs
Meatballs:
½ loaf Italian bread
Milk
1 head garlic, peeled and finely chopped
½ bunch Italian parsley, approximately 1 cup, finely chopped
1 pound ground beef
1 pound ground pork
1 teaspoon salt
1 teaspoon pepper
¼ cup Romano cheese
¼ cup Parmesan cheese
1 egg
18-20 ½-inch cubes of mozzarella cheese
½ cup extra virgin olive oil
1 cup plain bread crumbs
Sauce:
3 28-ounce cans whole peeled tomatoes
1 head garlic, peeled and finely chopped
½ teaspoon salt
½ tablespoon dried oregano, or 1 tablespoon fresh
½ tablespoon dried thyme, or 1 tablespoon fresh
½ tablespoon dried basil, or 1 tablespoon fresh
Hot, cooked pasta
To make meatballs: Hollow out the loaf of Italian bread, discarding crust, and break bread into rough chunks. Place the bread in a bowl and cover with milk; soak for at least 5 minutes.
In a large bowl, combine garlic, parsley, ground beef, ground pork, salt, pepper and Romano and Parmesan cheeses. Squeeze most of the milk out of the bread, and add the bread to the meat mixture. Add the egg, and mix with your hands until all ingredients are incorporated. The mixture will be moist and sticky.
Heat olive oil in a large saute pan over medium-high heat.
Take a palm-sized handful of the meat mixture and flatten it slightly against your palm. Place a chunk of mozzarella in the center of the mixture, and fold the meat around the cheese until you form a ball. Roll the meatball in bread crumbs, and shake off excess crumbs. Repeat this process until all of the meat mixture has been rolled into balls.
Place the meatballs in a single layer in the saute pan (this will take several batches). Brown the meatballs on all sides, approximately 3 minutes per side (the meatballs do not have to cook all the way through, as they will be added to the sauce). Remove the meatballs to a plate with paper towels or a paper bag to drain the excess oil. Set aside. Reserve the olive oil.
Makes 18 large meatballs.
To make sauce: Pulse tomatoes in a food processor, or use a knife to roughly chop the tomatoes while they are still in the can.
Strain the reserved olive oil from the meatballs into a stock pot over medium heat. Saute the garlic in olive oil for approximately 1 minute. Add the tomatoes, salt, oregano, thyme and basil, and bring to a boil.
Reduce heat to low and simmer, uncovered, for approximately 20 minutes. Add meatballs to the sauce and cook, still uncovered, at least 45 minutes to 1 hour. Remember: The longer the sauce simmers, the thicker and more flavorful it will become.
Serve spaghetti sauce and meatballs over your favorite hot, cooked pasta.
Discovering artichokes
June 19, 2008
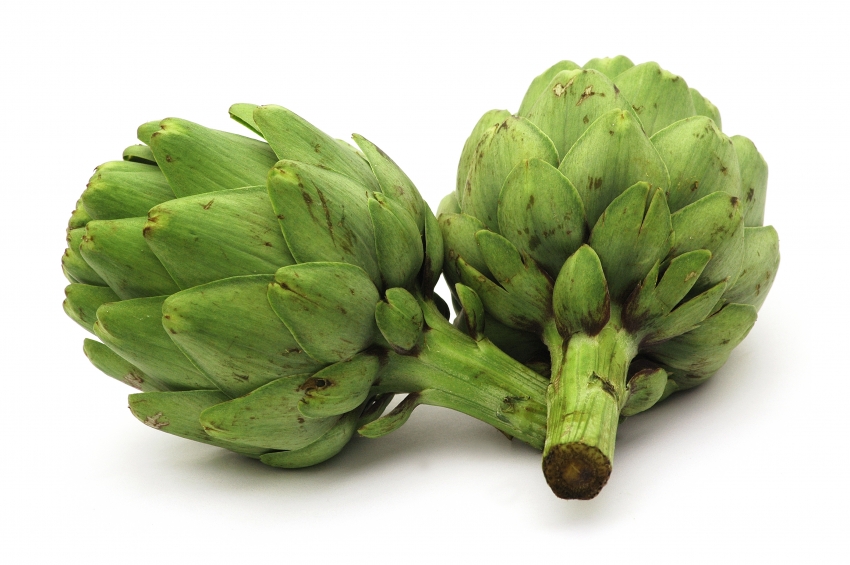
If you have never eaten an artichoke, you don’t know what you’re missing. And based on the quizzical look we often get when going through the check-out line, we’re guessing there are lots of people who haven’t given this edible thistle a try.
The taste of an artichoke is not easy to describe: it’s slighty nutty and mild, and matches quite well with lemon.
Our favorite way to eat an artichoke is steamed with a bit of lemon juice and thyme. Some people dip their artichoke leaves in a mixture of mayonnaise and lemon juice, but we prefer ours with plain old melted butter (or, if it’s a particularly good artichoke, with nothing at all). To see some other options, from Creamy Thai Dip to a low-calorie dill dip, visit http://www.artichokes.org/recipes.html.
—
Steamed artichoke
1 artichoke
1 lemon, halved
½ teaspoon salt
Melted butter, for dipping
Pull off the small bottom leaves around the stem of the artichoke, and cut the stem flush with the bottom of the artichoke so that it will sit flat in a steamer. Rub lemon immediately over the freshly-cut area to prevent oxidizing (turning brown). Cut the top ¼ of the artichoke off and discard leaf tops, again rubbing lemon over the freshly-cut area.
Place the artichoke in a steamer, stem down, and squeeze the juice from the lemon halves on top of the artichoke. Put the lemon halves in the steamer with the artichoke and steam for approximately one hour or until the leaves come off with a gentle pull. Sprinkle the steamed artichoke with salt.
To eat: Remove one leaf at a time, dip in butter and scrape the “meat” from the leaf with your teeth. (We are a family of both top- and bottom-scrapers. Jamie uses her top teeth, while Jerry and Cera use their bottom teeth. Choose whichever method is most comfortable, and most productive, for you.)
Once you get down to a point where it’s difficult to pull off one leaf at a time, remove the remaining leaves. What’s left is the heart and the fuzzy part of the thistle called the chote. Remove the fuzzy chote, which is at the top of the heart, with a knife or scoop it out with a spoon. Trim the edges around the heart, and you are left with the artichoke’s greatest delicacy. Cut up the heart evenly to prevent arguments, dip the pieces in butter and enjoy.
—
This recipe, which features artichoke hearts in an alfredo sauce over pasta, is intended for people who really like artichokes. If you’re making this dish for the first time, or you’re unsure about your love for artichokes, you might want to cut the amount of artichoke hearts to one can.
Artichoke alfredo
1 tablespoon olive oil
1 ½ tablespoons shallots, finely chopped
1 tablespoon garlic, finely chopped
2 cans artichoke hearts, drained and roughly chopped
1 teaspoon thyme
½ teaspoon salt, plus additional to taste
1 teaspoon pepper, plus additional to taste
1 tablespoon lemon juice
1 ¼ cups dry white wine
1 cup heavy cream
1 cup pecorino romano cheese
½ cup parmesan cheese
Your favorite pasta, cooked and drained (we prefer angel hair pasta with this dish)
Heat olive oil in large saute pan over medium heat. Add shallots and garlic and saute one minute, stirring constantly.
Add artichoke hearts, thyme, salt and pepper, and saute two minutes, stirring occasionally.
Add lemon juice and white wine, and bring to a boil. Reduce heat to medium low, and cook until the liquid is reduced by one half, approximately eight to 10 minutes.
Add heavy cream and stir to incorporate. Cook another three minutes.
Add cheese and stir. Remove from heat. Add salt and pepper to taste.
Serve over hot, cooked pasta. Yields six servings as a main dish.
Turkey in mushroom cream sauce
June 19, 2008
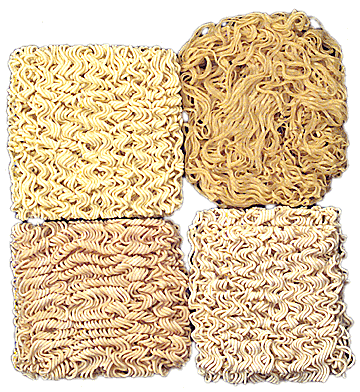
Anyone who was a struggling college student is familiar with the culinary delicacy known as ramen – a package of instant, thin, white noodles available in nearly every imaginable flavor, from plain old beef to chicken vegetable to picante shrimp. It wasn’t the most fulfilling meal, but it was simple to make (just add water and heat), and the best part was the cost – approximately 15 to 20 cents per package, and even less if you could find it in bulk.
Our tastes have become much more sophisticated since college, but that doesn’t mean that ramen doesn’t still have a place in our kitchen. This dish, one of Jerry’s originals, combines the instant noodles with turkey cutlets in a creamy mushroom sauce.
—
Turkey in mushroom cream sauce
Cajun seasoning (recipe follows)
4 turkey cutlets
8 ounces button mushrooms, sliced
2 tablespoons olive oil, divided
½ teaspoon salt
½ teaspoon pepper
1 teaspoon Italian seasoning
1 14.5-ounce can chicken broth
2 cups heavy creamy
2 3-ounce packages ramen, chicken mushroom flavor
Lightly coat each side of the turkey cutlets with Cajun seasoning.
Heat 1 tablespoon olive oil in a large skillet over medium-high heat. Brown the turkey cutlets for approximately 1 minute per side and remove from pan. Set turkey aside.
Add another tablespoon of olive oil and the mushrooms to the skillet, and season with salt, pepper and Italian seasoning. Cook for 3 to 4 minutes, stirring occasionally.
Add ¾ of the can of chicken broth and reduce the heat to medium. Cook approximately 10-12 minutes, or until the broth has reduced by approximately three-fourths.
Add heavy cream, and stir to incorporate. Bring the mixture to a boil, then reduce heat to medium-low. Cook for 5 minutes, stirring occasionally.
Meanwhile, prepare ramen according to package directions. When ramen is cooked, drain the noodles and add to the mushroom mixture. Return the turkey to the skillet and cook over medium-low heat for 5 minutes.
To serve, place one turkey cutlet on each of four plates, then divide noodles evenly among the plates. Spoon mushroom sauce over the turkey and noodles.
Serving hint: A warm, crusty loaf of bread makes a nice accompaniment to this meal . Torn into large pieces, the bread is perfect for sopping up any leftover mushroom sauce.
—
Cajun seasoning
2 ½ tablespoons paprika
2 tablespoons garlic powder
1 tablespoon onion powder
1 tablespoon cayenne pepper
1 tablespoon thyme leaves
1 tablespoon kosher salt
1 tablespoon pepper
Combine all ingredients and store in an airtight container.
Fried chicken burritos and chicken quesadillas
June 17, 2008
With our busy schedules, it is a bonus any time we can get two meals for the effort of one. Starting with this simple recipe for spicy shredded chicken, we can make two of our favorite dishes: fried chicken burritos and chicken quesadillas. The chicken also makes a great topping for nachos or Mexican pizza or a fantastic filling for fajitas or chicken tacos.
—
Shredded chicken
4 boneless, skinless chicken breasts
1 teaspoon salt
2 teaspoons chili powder
1 teaspoon cumin
½ teaspoon black pepper
¼ teaspoon cayenne pepper
1 tablespoon vegetable oil
4 jalapeños (with seeds), sliced
6 cloves garlic, whole or halved
Water
Heat vegetable oil in a large skillet or dutch oven with lid over medium-high heat. Combine spices, and coat chicken on both sides with spice mixture. Brown chicken in skillet for approximately 1 minute, then turn over and add garlic and jalapeños. Cook 1 minute on second side, then add water until ¾ of the chicken is covered. Bring to a boil, then cover and reduce heat to low. Simmer for 1 hour.
Remove chicken from skillet, reserving juice, jalapeños and garlic. Using two forks, shred the chicken, then return to the pan with the juice.
—
Fried chicken burritos
Shredded chicken
1 can refried black beans
1 teaspoon lime juice
1 teaspoon cumin
1 package Spanish rice mix, prepared
1 8-ounce package shredded Mexican cheese blend
4 soft taco-size flour tortillas
¼ cup cilantro, chopped
1 tablespoon vegetable oil
Salsa, guacamole and sour cream for garnish
Heat vegetable oil in a large skillet over medium-high heat.
Combine lime juice, cumin and refried black beans in a microwave-safe bowl. Heat in microwave for 1 minute. Stack tortillas on a microwave-safe plate, separated by wet paper towels, and microwave for 30 seconds.
Place 2 heaping tablespoons each of shredded chicken, black bean mixture, Spanish rice and shredded Mexican cheese and ¼ of the cilantro in the center of a tortilla. Fold over one side of the tortilla and use your fingers to tuck the edge of the tortilla under the filling. Fold in the top and bottom edges of the tortilla and roll the burrito tightly. Place in the heated frying pan with the burrito seam side down. Fry until golden brown, approximately one minute, then flip and brown on the opposite side. Continue flipping the burrito until all four sides are browned. Remove burrito from the skillet.
Repeat process with the remaining filling and tortillas.
Serve with salsa, guacamole and sour cream to garnish.
Note: Refrigerating the chicken in the juices with the jalapeños and garlic will help intensify its flavor until you are ready to make the chicken quesadillas. Also, save the leftover black beans and Spanish rice as side dishes to accompany the quesadillas.
—
Chicken quesadillas
Shredded chicken
1 8-ounce package shredded Mexican cheese blend
4 soft taco-size tortillas
1 tablespoon vegetable oil
Salsa, guacamole and sour cream for garnish
Heat vegetable oil in a large skillet over medium heat.
Place a tortilla in the skillet; on one half of the tortilla, layer ¼ cup cheese, then 2 heaping tablespoons shredded chicken and another ¼ cup cheese. Fold over the other half of the tortilla to make a half-moon shape. Fry for one minute, then turn over the quesadilla and fry for one minute on the other side. Remove quesadilla from the skillet.
Repeat process with the remaining filling and tortillas.
Serve with salsa, guacamole and sour cream.
Potatoes, times three
June 13, 2008
The potato is a very versatile tuber, and, with Jamie’s insistence that we have a starch (as well as vegetables) with nearly every meal, it has become a staple in our diet.
We eat potatoes mashed and drizzled with gravy, baked and slathered with sour cream, and cut in to French fries of all shapes and sizes.
And while many of our recipes negate the fact that potatoes are naturally fat-free and low in cholesterol, we justify the following recipes by noting that potatoes have other nutritional components as well: no matter how you prepare them, they are high in vitamin C and potassium and are a good source of both vitamin B6 and dietary fiber.
So dig in to these potato dishes today – and don’t let any feelings of guilt overshadow their terrific taste.
—
These twice-baked potatoes, which can be served individually or as a casserole, are an oft-requested side dish when relatives come to visit. While we prefer the original, high-fat version, you can cut the calories by substituting turkey bacon and low-fat or fat-free sour cream and cheese. Also, if you like to spice things up a bit, add a diced jalapeño or two before returning the potatoes to the oven for their second baking.
Twice-baked potatoes
4 large baking potatoes, washed and dried
Olive oil
Kosher salt
½ pound bacon
8-ounce container sour cream
1 package shredded Mexican cheese
1 bunch green onions, chopped
Preheat oven to 400 degrees.
Using a knife, make four 1-inch slits in the top of each potato. Lightly coat each potato with olive oil and sprinkle with kosher salt. Individually wrap in aluminum foil and bake for 1 hour. Remove from oven. (Note: Stop at this point and you have plain baked potatoes with a wonderfully salty skin.) Reduce heat to 350 degrees.
Unwrap potatoes, and allow to cool. Meanwhile, cook the bacon until crisp, then cool and crumble.
To prepare as individual servings: Halve each potato lengthwise. Put top half of each potato (including skin, for added texture) into a large mixing bowl, and hollow out the bottom of each potato, leaving approximately ¼ inch of potato along the sides for stability. In the bowl, combine potatoes, potato skins and sour cream using a hand held potato masher or electric mixture (we prefer the hand held masher as it adds more texture to the dish). Stir in crumbled bacon, Mexican cheese and green onions. Spoon an even amount of potato mixture into each of the four skins. Bake in a 350-degree oven for 20-30 minutes, or until cheese is melted and filling is slightly browned on top.
To prepare as a casserole: Remove skins from potatoes, reserving half (using all of the skins will make the casserole too salty). In a large mixing bowl, combine potatoes, potato skins and sour cream using a hand held potato masher or electric mixer (we prefer the hand held masher as it adds more texture to the dish). Stir in crumbled bacon, Mexican cheese and green onions. Spread potato mixture into an ungreased 13-by-9-inch baking pan and bake in a 350-degree oven for 20-30 minutes, or until cheese is melted and casserole is slightly browned on top.
—
After receiving a rosemary bush as a gift when we moved into our home a few years ago, we became hooked on fresh herbs. In addition to “Rosy,” who has blossomed from a three-spring plant into a full-blown bush, we now grow two varieties each of basil and oregano, three varieties of thyme, garlic chives, sage, mint and whatever else tempts our taste buds from season to season. This recipe uses two of our favorite herbs – thyme and rosemary – and turns tender red potatoes into a fabulously fresh side dish.
Herbed red potatoes
6 to 8 red potatoes, cut into 1 ½- to 2-inch cubes
1 cup chopped onion (optional, but adds a nice sweetness to the dish)
6 to 8 cloves garlic
1 tablespoon fresh thyme
1 tablespoon fresh rosemary
1 teaspoon kosher salt
1 teaspoon pepper
¼ cup olive oil
1 tablespoon balsamic vinegar
Preheat oven to 400 degrees.
Using a small food processor, chop garlic, thyme and rosemary.
Combine garlic, herbs, salt and pepper in a one-gallon plastic bag. Add potatoes and onions (if using), then pour in olive oil and balsamic vinegar. Seal bag and shake until potatoes are covered in herb mixture.
Spread potatoes into ungreased 13-by-9-inch baking pan. Bake, stirring every 15 minutes to ensure even cooking, until golden brown and slightly crispy on the outside, approximately 1 hour.
—
We have tried a number of recipes for baked French fries but never came across one that made us consider turning our backs on the deep fryer – until a few weeks ago.
Created by Irene Marshall of Nampa, Idaho, this recipe for Chili-Seasoned Potato Wedges makes thick “fries” that are both crisp and nicely spiced. And they were even better as leftovers (reheated in the oven, not the microwave), as the flavors seemed to have melded further.
A quick hint: This recipe only uses 1 tablespoon of onion soup mix, which is quite a bit less than comes in a typical packet. Save the leftover mix in a plastic baggie or other small container because you will want to make these again.
Chili-Seasoned Potato Wedges
1 tablespoon onion soup mix
1 tablespoon chili powder
¼ teaspoon salt
1/4 teaspoon garlic powder
¼ teaspoon pepper
4 large baking potatoes
2 tablespoons vegetable oil
In a large, resealable plastic bag, combine the soup mix, chili powder, salt, garlic powder and pepper. Cut each potato into eight wedges, place in the bag and shake to coat.
Arrange in a single layer in a greased 15-by-10-by-1-inch baking pan. Drizzle with oil. Bake, uncovered, at 425 degrees for 20 minutes. Turn; bake 15-20 minutes longer or until crisp. Yield: 8 servings.
Source: Country Woman magazine, September/October 2005.
Shrimp etoufee
June 13, 2008
It was with two very heavy hearts that we watched Hurricane Katrina storm ashore on the Gulf Coast nearly three years ago. Much of Jerry’s family lived in the region, including his grandfather and two uncles in Louisiana; an aunt in Mississippi and another aunt in Alabama. It was nearly three days before we learned that everyone was safe, which was the most important thing. But PaPa and Uncle Robbie’s Lakeview home in New Orleans was destroyed.
Jerry has many fond memories of his annual childhood visits to the Big Easy, and we were lucky enough to share this magical city with our daughter Cera in June 2005, just weeks before Katrina hit. It was the first time we ourselves had been to the city in nearly eight years – a much different experience than our previous visit in our early 20s when it was all about the nightlife.
In addition to visiting with family, we tried to introduce a then-2-year-old Cera to as much of the history and culture of New Orleans as she could absorb. We took a carriage ride through the French Quarter, rode the historic carousel in City Park and strolled along the banks of the Mississippi River. In the open-air French Market, we bought Cera new children’s books about alligators and crawfish, and we watched with delight as she twirled to jazz music at a sidewalk cafe.
Then there was the food – beignets and Cafe Au Lait at Cafe Du Monde, muffulettas at Central Grocery Co., Sno-Balls at City Park, crawfish etoufee at a roadside eatery that we probably couldn’t find again if we tried. But the highlight was definitely the shrimp. We ate it fried, sauteed, boiled, served over rice and in gumbo. It was at times spicy, at other times golden brown and crunchy, but it was always good.
As New Orleans continues to pick up the pieces, we offer you a taste of the city with Jerry’s recipe for an easy shrimp etouffee. Hopefully someday soon, you’ll be able to experience the sights, sounds and flavors of this enchanting city for yourself.
—
As with many regional dishes, etouffee features the “holy trinity” of Creole and Cajun cooking: chopped onion, celery and bell pepper. And while Jerry tried to control the heat of this dish with just a ½ teaspoon of cayenne pepper, feel free to add a little more if you like your shrimp extra spicy – in fact, we made our last batch with a full teaspoon, and it was wonderful.
Shrimp etouffee
2 pounds 26-30 count shrimp (ideally with heads on)
Shrimp stock:
4 cups water
Shrimp shells
3 tablespoons bacon grease
¼ cup flour
1 ½ cups onion (approximately 1 medium onion), chopped
¾ cups celery (approximately two stalks), chopped
¾ cups yellow, red, green or orange bell pepper (your choice, approximately 1 pepper), chopped
3-4 cloves garlic, minced
1 teaspoon salt
Dash of pepper
1/2 teaspoon cayenne pepper
1 teaspoon hot sauce
1 teaspoon dried thyme, or 2 teaspoons fresh thyme
Hot, cooked rice
Peel and devein shrimp, reserving the shells, and put in refridgerator until ready to use.
To make shrimp stock, bring water to a boil. Add shrimp shells and reduce heat to low. Simmer for 45 minutes to an hour, bring careful not to allow the mixture to overboil. Drain and discard shells.
In a large skillet, make a roux by heating bacon grease over medium/high heat. Add flour, stirring constantly for approximately five minutes, until roux is the color of coffee with a bit of cream.
Add onion, celery, bell pepper, garlic, salt, pepper, cayenne pepper, hot sauce and dried thyme and saute over medium heat, stirring occasionaly, for 10 minutes or until vegetables are tender. Add ¾ of the shrimp stock and bring to a boil. Reduce heat to medium low and simmer for five minutes.
Add shrimp. Return to medium heat and cook until shrimp are pink, approximately eight to 10 minutes. Add remaining shrimp stock to reach your desired thickness (if you like your etoufee thick, it may not be necessary to add any additional stock).
Serve over hot, cooked rice.
Vegetarian egg rolls and fruit smoothies
June 12, 2008
Cooking doesn’t have to be a chore.
In fact, with a little planning, the right recipes and a family that’s willing to work together in the kitchen, you can dine on restaurant-quality meals every night in the comfort of your own home.
We know there are times that you won’t feel like preparing a home-cooked meal, and, believe us, we understand. We both work full-time and both commute several hours a week. And we have two children, ages 5 and 2. Finding the time to cook some nights can be difficult, if not downright impossible. So order the occasional pizza, and don’t feel bad using boxed rices or frozen vegetables as side dishes – there are actually some pretty good offerings out there. But don’t completely abandon your kitchen.
What we hope to do in this blog is share our passion for cooking and, more generally, for good food. We’ll serve up some of our own recipes, most of them created by Jerry, who handles 90 percent of the cooking duties at our house, as well as some of our favorite dishes culled from the cookbook collection that is slowly overtaking our kitchen. Not all of the recipes will be healthy – in fact, Jerry’s twice baked potatoes, an oft-requested side dish of our family members, are downright sinful – but they’ll be simple enough to create at home – and they’ll taste good, too.
So roll up your sleeves, tie your apron strings, and get ready to dine in.
—
It was hard to decide which recipe to lead off with, but with the high price of many meats these days (and the even higher price of gas), we decided to start with a vegetarian dish that is inexpensive to make and should satisfy even the pickiest of eaters. Jerry created these vegetarian egg rolls after seeing a similar recipe on a cooking show. They make a great appetizer or side dish, although most of the time, we eat them as our main meal.
Vegetarian egg rolls
1 tablespoon extra virgin olive oil
1 bunch green onions, chopped
3 jalapeños, finely chopped
1 teaspoon chili powder
1 teaspoon cumin
1 teaspoon salt
1 teaspoon pepper
Dash of cayenne pepper (optional)
1 15-ounce can corn, drained
1 15-ounce can black beans, drained
1 15-ounce can diced tomatoes, drained
1 bunch spinach, chopped
1 8-ounce package Mexican cheese blend
1 16-ounce package egg roll wrappers
Water
Vegetable oil for frying
In a large skillet over medium heat, heat olive oil. Add green onions and jalapeños and season with chili powder, cumin, salt, pepper and cayenne pepper (if desired). Saute 10 minutes or until onions are soft. Add corn, black beans and diced tomatoes; cook for five minutes, stirring occasionally. Add spinach and cook five minutes, stirring occasionally, or until spinach is wilted. Cool mixture to room temperature. (Hint: To speed cooling, place vegetable mixture in the freezer for 10 minutes.) Add cheese and stir to combine.
Fill deep fryer with approximately 1 ½ inches of vegetable oil and heat to 400 degrees
To assemble egg rolls, with egg roll wrapper laying horizontally, place 1 heaping tablespoon of vegetable mixture approximately once inch from the top of the wrapper. Fold in the sides of the wrapper, and, using your fingers or a pastry brush, lightly wet the bottom ¾ of the wrapper with water. Keeping the sides folded in, roll the top inch of the wrapper over the vegetable mixture, and continue rolling until the wrapper is sealed.
Carefully lower egg rolls, one at a time, into the hot oil, making sure not to overlap. This will take several batches to complete. Don’t be surprised if a few of the egg rolls burst slightly and lose some of their filling. There will still be plenty inside. Fry until golden brown.
Makes approximately 20 egg rolls (three to four as a main dish serving or one to two as a side dish).
Hints: Serve egg rolls with a simple dipping sauce made from approximately ¾ cup salsa and a squirt or two of ranch dressing, to taste. Like most fried foods, these reheat much better in an oven than a microwave, which tends to make them greasy.
Also, if you have leftover vegetable mixture, don’t throw if away. It makes a great dip when reheated. Serve with tortilla chips.
—
Our children love fresh fruit, and there’s no better time than now to let them fill up on summer’s bounty. But sometimes when we’re raiding the produce section or farmer’s market, our eyes are bigger than our stomachs – and that means we end up with too much fruit and too little time to eat it before it goes bad. So we’ve started freezing our leftover fruit – washing, hulling and halving strawberries; peeling and quartering bananas; and washing and removing the stems from blueberries – to use for smoothies. That way we can get a healthy fruit snack anytime, and with the frozen fruit, we don’t have to water down our treat with ice.
Here’s one of our current favorites.
Fruit smoothie
1 fresh peach, quartered
6 to 8 frozen strawberries
36 to 40 frozen blueberries
½ frozen banana
Orange juice
Combine peach, strawberries, blueberries and banana in blender. Add orange juice until fruit is almost covered. Blend until smooth.
Hint: A touch of sugar or honey can be added for extra sweetness, but we find the combination of fruit and orange juice to be sweet enough for our taste.
